Welcome to the Blog for www.seekitout.co.uk.

Seek It Out: taster crafting kits and stunning designer items for your home

Visit www.seekitout.co.uk TODAY!


Tuesday, 28 January 2014

One-Pot, Wonderful


The nights still close in early and cold chills in the air means warming, comfort food is a must. Here's a wonderful way to quickly put together a hearty meal for a family, or for two; the extra can be frozen and saved for future 'quick' fixes.

All you need is:

1 pot
1 knife & board
and a Wooden Spoon

along with these (or a variation) ingredients:

1 whole Chicken
2 Onions, quartered
2 Garlic Cloves, roughly chopped
2 Celery Sticks, roughly chopped
8 - 10 Baby Carrots, trimmed or 4 large, roughly chopped
8 - 10 Baby Marrows, trimmed or 3 large, roughly chopped
A handful of cherry tomatoes
1 Cup of Brown Rice
1 Cup of Soup Mix (I like to make my own with 1/2 Black Lentils, 1/4 Barley, 1/4 Split Peas)
1/2 Lemon

Herbs of your choice, I like the following:

2 Fresh Rosemary twigs 
3-4 Bay Leaves
2 tsps Oregano

plus Salt and Black Pepper to taste.

First fill the kettle and pop it on to boil. While you wait for the water you can prep the veggies by topping and tailing the Carrots and Marrows, or chopping into large chunks if using larger veg.
Rinse all these under the tap to make sure the skins are all clean and lovely. No time is wasted peeling and all the goodness is preserved.
Peel and quarter the Onions and Garlic cloves and chop the celery into smaller pieces.

The kettle should now have whistled so, pop your whole Chicken, ensuring there are no giblets in a little packet inside, along with all the veggies into a large pot and fill up to cover the chicken with the hot water.
Turn on the stove to a medium to high heat to get the liquid bubbling.
Now add the Rice and Soup mix to the top as well as the herbs and Black Pepper. I tend to only add the Salt towards the end of cooking because it can make the meat tougher.

Put the lid on the pot and turn down the heat and leave for an hour; I recommend using this time to relax with a glass of wine and your latest knitting project!
After an hour give the pot a stir making sure the grains are not sticking to the bottom and there is still liquid bubbling in the top. Squeeze the lemon into the pot and add the rind too. Then season with salt and pepper and leave for another 1/2 hour.
You may like to add a chicken stock cube or some other spices to your version. More lemon, cumin and some cayenne makes a wonderful exotic tasting dish for those who are more adventurous.

Dish up the rice and veggies in a big heap with Chicken that falls off the bone ...and enjoy! One pot, very little prep and just a little dash of patience to make a healthy, homely meal. 
This makes enough for 4 generous portions. Perhaps also a little extra leftover that you can add 500mls of stock to for a lovely soup the next day.

Thursday, 23 January 2014

SIO Tips no. 56: Using up wool oddments

Wool oddments can make your craft box look a real mess; there are some great ways to use up the funny assortment of colours out there. 
A big favourite is to knit a whole lot of squares for a knitted patchwork quilt; great for a baby blanket and family heirloom. 
This also makes a great project to teach a new knitter as the squares can be whatever size you like, great practice to get the hands used to knitting and quick to put together with amazing results.
 

Monday, 13 January 2014

SIO Tips no. 55: Gardening jobs for January

It may be cold outside but there are still jobs to do in the garden to prepare for Spring. 
Now is the time to plan your planting and prune those fruit trees.
Don't forget to keep feeding the little birds; they need the extra food now.

Wednesday, 18 December 2013

Wrap it up! - Creative Gift wrapping tips no. 4


There are lots of ways to make your pressies stand out from the crowd; Here is our latest fab idea to make your wrapping unique this year:

You can buy simple card boxes which you can paint, decoupage or cover with sparkling beads, not only does it hold the gift, it goes on to be a second bonus gift.

Luggage tables, lino cutouts and even key rings can make brilliant gift tags.The world is there for the taking, go on enjoy yourself.

SEEK IT OUT: Changing the world a stitch at a time.

Wednesday, 11 December 2013

Wrap it up! - Creative Gift wrapping tips no. 3


There are lots of ways to make your pressies stand out from the crowd; Here is our latest fab idea to make your wrapping unique this year:

Why not write a little poem to appear on your wrapping, personalise for each gift. Old photos also make great gift tags. Use tubes from kitchen roll, cover and pinch the ends to make great necklace gift boxes.

SEEK IT OUT: Changing the world a stitch at a time.

Wednesday, 4 December 2013

Wrap it up! - Creative Gift wrapping tips no. 2


There are lots of ways to make your pressies stand out from the crowd; Here is our latest fab idea to make your wrapping unique this year:

Brown paper, wall lining paper or even newsprint (go for the glossy not the daily, it rubs off) makes for unusual and fun wrappings.  There are lots of £1 shops on the high street and chains offering budget craft supplies.  Look out for sticker books, ink stamps, discount ribbons and coloured pens. Armed with this lot you can take simple brown paper and personalise it to make a present special, thoughtful and unique.

SEEK IT OUT: Changing the world a stitch at a time.

Tuesday, 3 December 2013

SIO Tips no. 54: Choosing the Right Needle


Always use the right size sewing machine needle for the job, don't just consider the fabric consider how thick the thickest piece will be.  You might be using thin cotton but if six layers thick it changes the needle to use.


SEEKITOUT: Changing the world a stitch at a time.

Wednesday, 27 November 2013

Wrap it up! - Creative Gift wrapping tips no. 1


There are lots of ways to make your pressies stand out from the crowd; over the coming weeks we'll give you a some fab ideas to make your wrapping unique this year: 

Inexpensive fabric remnants make for lovely wrappings. You can turn over and iron quick hems with wonderweb or stitch using zigzag or other pretty stitches in a contrasting colour. Glue a remnant of the fabric to card and cut out designer gift tags to complete the look. 

SEEK IT OUT: Changing the world a stitch at a time.

Tuesday, 12 November 2013

Baubles re-visited - Another look at last years decorations


Last year I wrote this blog about making mini Pinatas for the Christmas Tree. They were so popular with the kids and grown-ups alike I thought I would re-share this great way to make the festive season even more special!

Christmas eve is going to be extra busy this year with all the nephews and nieces coming for dinner. Excitement levels will be sky high so I decided to arrange a little pre-emptive entertainment.

Pinatas are everywhere at the moment - for children's parties, Hallowe'en and festivals. So why shouldn't Christmas get the mexican treatment too?

Getting prepared
You will need:

Pack of small balloons
Scissors
Ribbon to hang
Shredded Newspaper/Brown Paper/Tissue Paper
Paste (1Cup flour to 2 Cups Water and pinch salt)
1" paint brush
2 Lengths of cardboard
Treats to fill the finished baubles
Embellishments to decorate


Mixing the paste
Firstly make up your paste: It's really very simple, boil together 1 Cup plain flour with 2 cups water - keep stirring until it starts to thicken then add a pinch of salt and take off the heat. I store mine in a used yoghurt pot with a sealable lid (keep in a cool place). Once this is made you're ready to set up a work space, be sure to lay down newspaper or a plastic sheet on your table and an apron to protect your clothes. Get comfy with a nice pot of tea or a glass of wine before you start.

Keeping things neat
I made a simple stand to hold the balloons as they dried by cutting two lengths of card (kindly decorated by my 2 year old nephew) I cut a slit down the middle of each piece and slotted them together to make a X shape. Along each side I cut two more shallow slits to hold the knots of the balloons as they were drying.

Now you can shred your paper and blow up the balloons to the size you prefer (I decided on keeping them fairly small and liked the varied shapes not being properly round)

Ripped paper is better
I found that the cut paper wasn't so easy to stick and blend in as ripped paper so forget precision and get stuck in - great for stress relief but noisy so not great if your family is trying to watch their favourite program in the same room but is fun if you have a little helper.

First layer going on
I brushed a layer of the paste onto the balloon as well as onto the paper itself. You'll find that the paste soaks through the paper this will give it strength when its dry. I left mine overnight to dry and did another layer the following afternoon.


Left out to dry
These take a little while to make because each layer needs to dry before adding the next. You can speed up the drying time by choosing a warm place to leave them to dry or perhaps a hairdryer?


Securing the ribbon
After the second layer is dry you need to add your ribbon. I taped it to the bottom and all the way around before adding another layer of paper. This way the hanging loop is firmly attached ready for the kids to bash them on Christmas eve.
Be sure to leave a gap either side of the ribbon ready for you to make the opening to fill the baubles when this layer is dried.


Ready to be filled & decorated
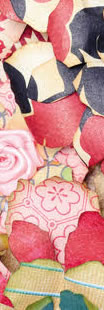
Another layer goes on top I finished some with Brown Paper ready to be embellished with sparkles, buttons, ribbons or metallic pen, some had a layer of white tissue to help masque the newsprint before painting and the others will have one more layer using christmassy gift wrap to make an easy decorative finish. When this layer is dry you will see the pinatas are now quite tough and ready to be filled. Take your scissors and cut a hole big enough to fit your treats through in the top, cutting the knot off the balloon and you can carefully pull the rubbery layer out.


Sweet inside
Now to fill with sweets and tissue paper pieces (only if you don't mind cleaning the confetti up) and seal the top to match the last layer before decorating.

Now really is the fun part - you can decorate these baubles however you like...so let your imagination run and get the kids involved too, they'll love decorating their own, though they may not want to bash them open on the night - they can always get to the goodies inside by poking through the thinner layer covering the hole.


Ready for the tree
Have fun being creative this Holiday season...

Ruthie
in South Africa


Monday, 4 November 2013

SIO Tips no. 53: Felting


Felted wool, knitting and then felting.  Dry as quickly but as naturally as you can, suggest a baking rack on a tray in a warm kitchen. Tease into shape very gently.


SEEKITOUT: Changing the world a stitch at a time.

Wednesday, 9 October 2013

Curious Cat for Hallowe'en


Hallowe'en is a nice excuse to get crafty; I decided to stretch my stitching skills after a long time of not sewing anything.

I think this Curious Cat is just Puuurrrfect for October:


If, like me, you haven't done any sewing for a while the extra bonus with the curious cat comes as a 'Stitch and Keep' sewing guide that you can practice all the stitches on before you finish off on the proper piece. 


The kit comes with all the embroidery silks needed to embellish the printed design. I find working with an embroidery hoop much easier as it keeps the work taut and you're less likely to end up sewing two sides together by accident.


It's really simple to follow the areas that need to be worked and you can choose between the colours provided depending on what you prefer.


Now all I need to do is plan whether to make it into a cushion or frame it for the wall.....

If you haven't tried your hand at stitching before, I would recommend these wonderful kits designed by Nancy Nicholson 


Tuesday, 1 October 2013

SIO Tips no. 52: Sewing Machine Needle Care


Sewing machine needles should be changed reasonably often to ensure crisp sewing stitches and the smallest possible puncture marks.  Will look less unsightly if you have to unpick.


SEEKITOUT: Changing the world a stitch at a time.

Monday, 23 September 2013

"No New Clothes for Jodie" - Part 2

Guest blog from Space to Sew 

"I have to say that in taking up the gauntlet to join in the Jodie "No New Clothes Challenge" I wasn't expecting it to turn competitive - or for my clothes to be copied before I've even had a chance to wear them! Though admittedly sharing patterns and ideas is one of the huge benefits of sewing with others. Nevertheless as the first version of my 40s blouse (pictured left) is finally complete (who says I never do any sewing or complete anything?!) it has been so admired that it is already being copied by the amazing Jodie, allegedly because she so loves the pattern she's been dying to sew it. I have to admit that despite my apparent protests she is of course right: it is a great pattern, though I wish I could take credit for it. Credit is however due to tutor Kate, designer extraordinaire, who spotted its potential - for me at least! - the moment the pattern arrived. I originally only intended to make the skirt: it was Kate who suggested I make the blouse (and bolero actually!) and I really only agreed to work on the blouse because the original blouse or bolero pieces will be much easier to frame than the skirt ones due to their smaller size. (Apologies: the original pieces are still not framed as I am still trying to work out how to do that effectively!).
However once again Kate's designer eye has been proved right and the 40s blouse is a huge hit, even though this 'prototype' is a first draft and not yet made to the standard I intend to achieve on repeating it. (cf. part of Goal no. 2: to sew the next one better!)
It would seem though that the blouse pattern is about to stand another challenge as Jodie and I usually wear completely different styles, so it will be interesting to see how it turns out for her. Isn't she lucky that I hadn't thrown the toile away and she could use it? A great recycling use of the first toile I drafted, though I am not totally convinced that Jodie should have evaded the original pain of tracing off an original 40s pattern without pins: be warned Jodie, you owe me a 'pattern trace'! That apart, I am actually quite excited at seeing the Jodie version (I heard a whisper from another Club member the other day about also wanting to make up their own version of the same blouse - Kate eat your heart out!). But ladies, I need to say very firmly at this point, that other than in a 1940s fashion show (do I sense an event coming on?), we absolutely cannot be seen wearing them at the same time at the same party! In the meantime I can say that thanks to the photographic evidence I can prove that I have completed Goal 1 of my 2013-2014 Dressmaking Goals. And whether I like to admit it or not just now, this is very much due to Jodie spurring me on because of the shared (non-competitive!) challenge. Hopefully the favour has been returned as she has just sent me her written Sewing Goals. So here they are below. Note the hoodie (where's the 40s influence in that?!) by her own admission one of her favourite items of clothing - don't worry Jodie: not an item you're in danger of me copying!
No new clothes for Jodie update: Jodie's 2013 Sewing Goals - in her own words of course!
"The aim of this challenge was firstly to improve my sewing, however 6 months in I feel somewhat behind where I wanted to be. I have had a few unexpected outside (to sewing) challenges but still! Inspired by Domini's sewing goals I am setting myself both projects to complete and also some techniques I would like to master alongside them. 
Here I go:
  1. I live with external hope of a summer so.... a summer dress (I have started this project already) Technique to be mastered.....lining a dress and fitting 
  2. A jersey dress, this is for the autumn/winter which will be here quicker than summer so best get started. Technique to be overcome.....jersey and the challenges it brings 
  3. A shirt, I love to wear shirts and they never appear to fit well so this is a challenge to be met. This will be my most advanced project of new things including buttons, collars, fitting, the dreaded placket word, so please wish me luck. 
  4. A hoodie, I LOVE hoodies and having already attempted one I think another more polished attempt is needed! 
  5. As mentioned by Domini above, the 1940's blouse pattern I have "borrowed" from her (thank you). I really love the style and so want to see if I can find my very own and see how this differs from modern patterns. Lots to learn here, vintage patterns are a whole new world and I will be looking to Domini and others at space to sew for help. 
Of all I make I will also complete a quick blog of how I get on, even if I fail! - Jodie"
Domini again: There's no question of Jodie failing as she just doesn't. She has the most extraordinary perseverance and tries things that others would rather not even attempt (and not just hoodies!). As regards helping you with vintage patterns I think it will be Kate and the other tutors we'll need to turn to for that. However I can help you by holding on to the patterns while you trace around them so you don't use any pins!
P.S. I'm glad you want to make a shirt. I'll let you experiment with that one first and learn from you I think. That is the most daunting project I can think of just now, but I know you'll succeed with it even if I don't!


@SpacetoSew
www.spacetosew.co.uk

Friday, 6 September 2013

SIO Tips no. 51: Easy Garlic


Peeling Garlic cloves can be a pain but no need for fancy gadgets; simply cut off the end where the clove attached to the rest of the bulb then roll the clove between your palms a couple of times applying enough pressure for the skin to come away from the flesh - Easy Peasy!

SEEKITOUT: Changing the world a stitch at a time.

Monday, 26 August 2013

SIO Tips no. 50: Pondlife

Pond fish eat more in the summer, feed them once or twice a day. It's better to feed them a little and often.
If the food has not been eaten within 15 minutes, remove and dispose of the excess. 
If you're going on holiday remember to get a friend or neighbour to feed your fish as well as watering the plants.


SEEKITOUT: Changing the world a stitch at a time.